Enjoy Vindictus with a low spec PC!
Page 1 of 1
 Enjoy Vindictus with a low spec PC!
Hello, Vindictus fans!
Are you excited for the battle? Well, beating fomors up will never be an easy task even if you can move your character as quickly as you’d like. That’s why you never want any lag to distract you from a high-tension battle.
The two main factors that contribute to a choppy experience are your network and PC hardware specifications. Choosing the right server and finding a better pinged host can be good way to avoid network lag issues. Vindictus’s superior graphics and flashy effects can also be a factor. You can still play the game without a hitch on low-spec PC as long as you adjust the video options appropriately.
Here’s how to do that:
BASIC OPTIONS
- Click “Options” key to activate option window.
- Click the Video tab to see the menu below.
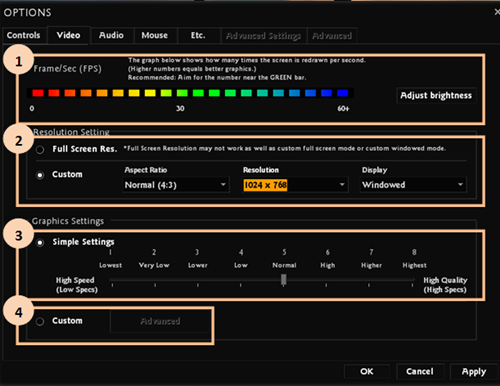
1. Frame/Sec (fps. frames per second)
This is the how many times the screen is redrawn in one second. It is displayed as a bar graph in the above screen. The fps performance will be lowered when the objects are destroyed or during fast action. It’s recommended that you keep the bar at blue while your character is in the town.
2. Adjust Brightness
This will adjust the brightness of the screen (called the gamma value).This won’t affect your frames per second.
3. Resolution Setting
- Full Screen Res.
This will set the game to full screen resolution. Using this will bring up the web-based content like Marketplace and Cash Shop, faster than setting full screen resolution using custom settings. However, the fps performance will be lower than settings in the custom mode.
- Custom
1) Aspect Ratio: The choices are 4:3, 16:10, and 16:9. You should choose the right aspect ratio for your monitor.
2) Resolution: The graphics will be sharper at higher resolutions, but fps performance will suffer.
3) Display: You can choose between windowed mode and full screen mode. Fps will be lower when in Windowed mode.
* Set “4:3” in “Aspect Ratio” along with “Windowed” for “Display” to view in minimal window.
4. Graphics Settings
- Simple Settings: The settings are divided into eight levels. You can change your settings by moving the bar.
- Custom: Click “ADVANCED” button to open detailed setting options.
ADVANCED OPTIONS
Use “custom settings”to get the best balance between graphics quality and fps performance.

1. Model detail (Set it to Low for low spec PCs)

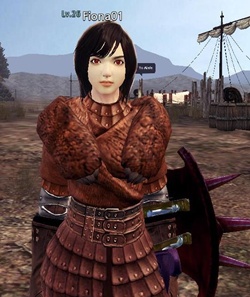
< Left image: Model detail is set at High. Right: Model details is set at Low>
This option adjusts the number of polygons (small shapes that make up a character) used for the characters. The lower the setting is, the more angular the character appearance becomes. It’s better to set this setting to low on low spec PCs.
2. Texture detail

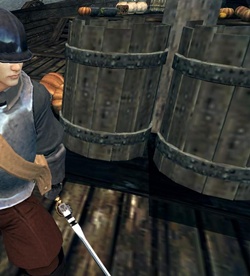
Setting this to high will improve the quality of the landscapes and characters look good. Setting this at low will lower the graphics quality, so this should be the last setting used.
3. Shader detail
This changes the lightness of object surfaces based on the distance from the light source and the angle at which the light hits the object. Setting this to high will create more realistically lighting. Set it to “low” on low-spec machines.
4. Water detail
This sets the quality of the water effect. Since there are many puddles in the ruins, it is better to set the water detail to “Simple Reflection” for low spec PCs in order to increase the fps performance.
5. Shadow detail
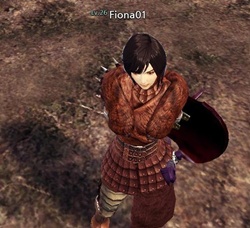
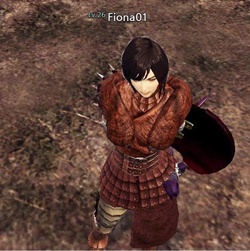
< Left image: Shadow detail is set at High. Right: Shadow details is set at Low>
This determines the quality of character and monster shadows. Set this to low for low spec PCs.
6. Color Correction
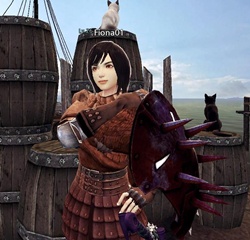

<Left image: Color Correction is enabled. Right: Color Correction is disabled>
This option corrects the color of the background and makes the character sharper and brighter. Enable it for low spec PCs.
7. Antialiasing mode
Anti-aliasing makes graphics smoother as the multiplication factors increase. For low spec pc, set it to None or 2x.
8. Filtering mode
This option sets the level of clarity of the background graphics. The background will be clearer as the multiplication factors increase. Set to Bilinear for low spec PCs.
9. Wait for vertical sync
This option synchronizes the monitor refresh rate and the frame rate. It prevents the fps from suddenly dropping. Set to Disabled for low spec PCs.
10. Motion Blur detail
This option uses an afterimage to make the movements more realistic. Set to Disabled for low spec PCs.
11. Cloth Physics detail
This sets the physical expression of the cloth. Cloth, such as clothing equipped by the character, is expressed fluidly. Leave this as it is.
12. Particle detail
This sets the particle details. This controls details like dust and flashes. Set it to Low for low spec PCs.
13. Normal Map Specular
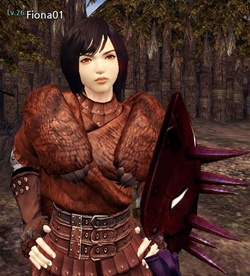
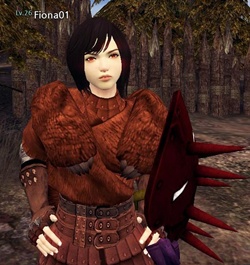
<Left: Normal Map Specular is Enabled. Right: Normal Map Specular is Disabled>
This affects the curves of graphic surfaces with contrasts. It’s better to keep this enabled.
14. Vignette Effect
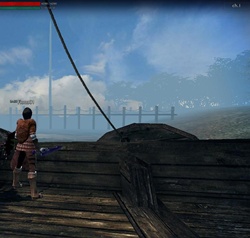
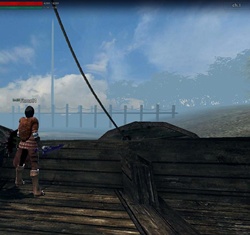
<Left: Vignette Effect is Enabled. Right: Vignette Effect is Disabled>
This option creates a vignette on the frame so that the attention will be focused on the center of the screen. It is better to turn this off for low spec PCs. The red effect for low HP will appear regardless of this option.
15. High Dynamic Range
Contrast level can be set with the High Dynamic Range Rendering option. Disable this for low spec PCs.
16. Hardware DirectX level
This option can set the Direct X version to 8 or 9. DirectX 8 version makes the game run more smoothly, but the graphic qualities will drop significantly. Keep it at DirectX 9
RECOMMENDED SETTINGS
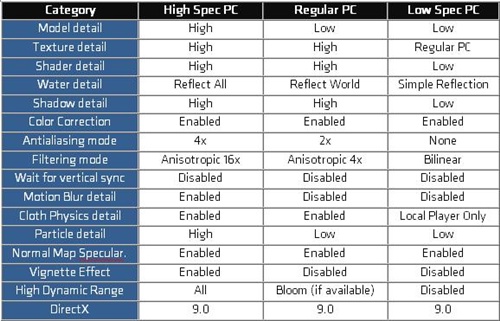
-A very special thanks to Gameabout.com, who published the original version of this article.-
Are you excited for the battle? Well, beating fomors up will never be an easy task even if you can move your character as quickly as you’d like. That’s why you never want any lag to distract you from a high-tension battle.
The two main factors that contribute to a choppy experience are your network and PC hardware specifications. Choosing the right server and finding a better pinged host can be good way to avoid network lag issues. Vindictus’s superior graphics and flashy effects can also be a factor. You can still play the game without a hitch on low-spec PC as long as you adjust the video options appropriately.
Here’s how to do that:
BASIC OPTIONS
- Click “Options” key to activate option window.
- Click the Video tab to see the menu below.
1. Frame/Sec (fps. frames per second)
This is the how many times the screen is redrawn in one second. It is displayed as a bar graph in the above screen. The fps performance will be lowered when the objects are destroyed or during fast action. It’s recommended that you keep the bar at blue while your character is in the town.
2. Adjust Brightness
This will adjust the brightness of the screen (called the gamma value).This won’t affect your frames per second.
3. Resolution Setting
- Full Screen Res.
This will set the game to full screen resolution. Using this will bring up the web-based content like Marketplace and Cash Shop, faster than setting full screen resolution using custom settings. However, the fps performance will be lower than settings in the custom mode.
- Custom
1) Aspect Ratio: The choices are 4:3, 16:10, and 16:9. You should choose the right aspect ratio for your monitor.
2) Resolution: The graphics will be sharper at higher resolutions, but fps performance will suffer.
3) Display: You can choose between windowed mode and full screen mode. Fps will be lower when in Windowed mode.
* Set “4:3” in “Aspect Ratio” along with “Windowed” for “Display” to view in minimal window.
4. Graphics Settings
- Simple Settings: The settings are divided into eight levels. You can change your settings by moving the bar.
- Custom: Click “ADVANCED” button to open detailed setting options.
ADVANCED OPTIONS
Use “custom settings”to get the best balance between graphics quality and fps performance.
1. Model detail (Set it to Low for low spec PCs)
< Left image: Model detail is set at High. Right: Model details is set at Low>
This option adjusts the number of polygons (small shapes that make up a character) used for the characters. The lower the setting is, the more angular the character appearance becomes. It’s better to set this setting to low on low spec PCs.
2. Texture detail
Setting this to high will improve the quality of the landscapes and characters look good. Setting this at low will lower the graphics quality, so this should be the last setting used.
3. Shader detail
This changes the lightness of object surfaces based on the distance from the light source and the angle at which the light hits the object. Setting this to high will create more realistically lighting. Set it to “low” on low-spec machines.
4. Water detail
This sets the quality of the water effect. Since there are many puddles in the ruins, it is better to set the water detail to “Simple Reflection” for low spec PCs in order to increase the fps performance.
5. Shadow detail
< Left image: Shadow detail is set at High. Right: Shadow details is set at Low>
This determines the quality of character and monster shadows. Set this to low for low spec PCs.
6. Color Correction
<Left image: Color Correction is enabled. Right: Color Correction is disabled>
This option corrects the color of the background and makes the character sharper and brighter. Enable it for low spec PCs.
7. Antialiasing mode
Anti-aliasing makes graphics smoother as the multiplication factors increase. For low spec pc, set it to None or 2x.
8. Filtering mode
This option sets the level of clarity of the background graphics. The background will be clearer as the multiplication factors increase. Set to Bilinear for low spec PCs.
9. Wait for vertical sync
This option synchronizes the monitor refresh rate and the frame rate. It prevents the fps from suddenly dropping. Set to Disabled for low spec PCs.
10. Motion Blur detail
This option uses an afterimage to make the movements more realistic. Set to Disabled for low spec PCs.
11. Cloth Physics detail
This sets the physical expression of the cloth. Cloth, such as clothing equipped by the character, is expressed fluidly. Leave this as it is.
12. Particle detail
This sets the particle details. This controls details like dust and flashes. Set it to Low for low spec PCs.
13. Normal Map Specular
<Left: Normal Map Specular is Enabled. Right: Normal Map Specular is Disabled>
This affects the curves of graphic surfaces with contrasts. It’s better to keep this enabled.
14. Vignette Effect
<Left: Vignette Effect is Enabled. Right: Vignette Effect is Disabled>
This option creates a vignette on the frame so that the attention will be focused on the center of the screen. It is better to turn this off for low spec PCs. The red effect for low HP will appear regardless of this option.
15. High Dynamic Range
Contrast level can be set with the High Dynamic Range Rendering option. Disable this for low spec PCs.
16. Hardware DirectX level
This option can set the Direct X version to 8 or 9. DirectX 8 version makes the game run more smoothly, but the graphic qualities will drop significantly. Keep it at DirectX 9
RECOMMENDED SETTINGS
-A very special thanks to Gameabout.com, who published the original version of this article.-

Candy- I post too friggin' much

- Posts : 682
Join date : 2010-05-09
Location : Walking through rose bushes.
 Similar topics
» Vindictus v1.04 Update
» Vindictus v1.07 Update
» PVP in Vindictus
» My Vindictus Experience
» Vindictus v1.06 Update
» Vindictus v1.07 Update
» PVP in Vindictus
» My Vindictus Experience
» Vindictus v1.06 Update
Page 1 of 1
Permissions in this forum:
You cannot reply to topics in this forum